Don’t Dilute Your Results: A Guide to Custom Peptide Dilution Ratios
Why Getting Custom Peptide Dilution Ratios Right Is the Foundation of Accurate Research
Disclaimer: The information provided in this article is for educational and informational purposes only. It is not intended as medical advice, diagnosis, or treatment. Products and compounds referenced are for research use only and are not approved for human or veterinary consumption. Always consult a qualified professional regarding health or medical decisions.
Custom peptide dilution ratios determine exactly how much active compound ends up in each draw from a reconstituted vial. Get this wrong, and every downstream result in your research is compromised.
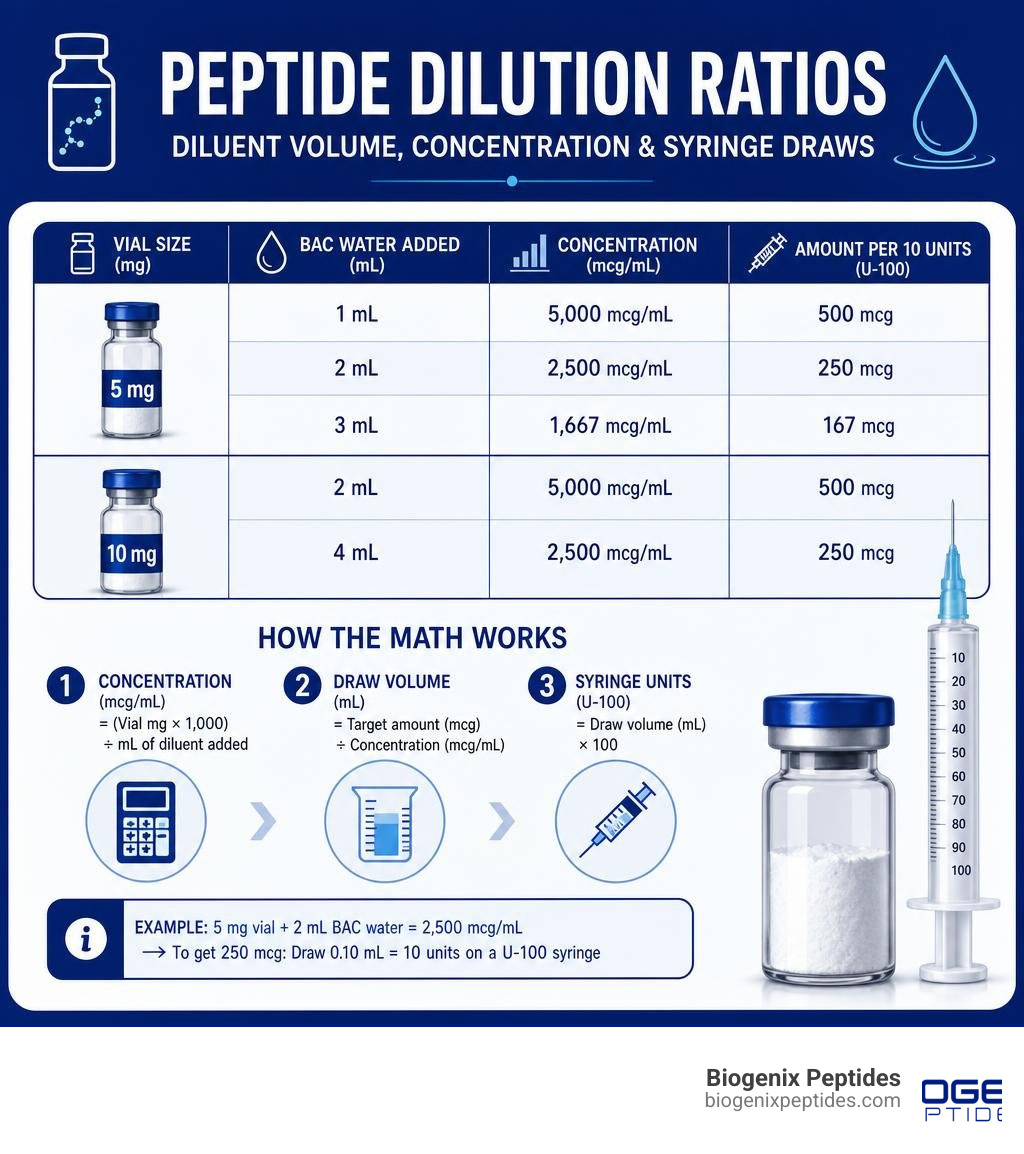
Here is a quick reference for the most common ratios used in peptide research:
| Vial Size | BAC Water Added | Concentration | Amount per 10 units (U-100) |
|---|---|---|---|
| 5 mg | 1 mL | 5,000 mcg/mL | 500 mcg |
| 5 mg | 2 mL | 2,500 mcg/mL | 250 mcg |
| 5 mg | 3 mL | 1,667 mcg/mL | 167 mcg |
| 10 mg | 2 mL | 5,000 mcg/mL | 500 mcg |
| 10 mg | 4 mL | 2,500 mcg/mL | 250 mcg |
The core formula is simple:
- Concentration (mcg/mL) = (Vial mg × 1,000) ÷ mL of diluent added
- Draw volume (mL) = Target amount (mcg) ÷ Concentration (mcg/mL)
- Syringe units (U-100) = Draw volume (mL) × 100
Most reconstitution errors are not chemistry problems. They are math problems — or more precisely, they are ratio problems.
A 5 mg vial reconstituted with 1 mL of bacteriostatic water delivers twice the concentration of the same vial reconstituted with 2 mL. That difference directly changes how much you draw for a given research amount. And yet, many researchers pick a water volume without thinking through the downstream math.
The global peptide therapeutics market is on track to reach USD 50.60 billion by 2026, driven in large part by demand for precise, reproducible research protocols. That level of investment makes one thing clear: measurement precision is not optional.
This guide walks through the complete math, the reconstitution process, multi-peptide blend calculations, and the most common errors — so your results reflect the science, not a pipetting mistake.
I’m Jay Daniel, Founder and CEO of BioGenix Peptides, and I’ve spent years working hands-on with peptide sourcing, quality control, and laboratory protocols, including developing standardized approaches to custom peptide dilution ratios that support reproducible research outcomes. In the sections that follow, I’ll break down everything you need to calculate ratios accurately — from single-compound vials to complex multi-peptide blends.
Understanding Custom Peptide Dilution Ratios and Concentration Math
To master custom peptide dilution ratios, we must first look at the relationship between mass, volume, and concentration. In laboratory research, we work with solid peptide mass (usually measured in milligrams) and liquid diluent volume (measured in milliliters).
The fundamental rule of concentration math is that the total mass of the peptide in the vial remains constant, regardless of how much liquid we add. When we add diluent, we are simply changing how spread out that mass is within the solution.
To perform these calculations, we must convert milligrams (mg) to micrograms (mcg). Because 1 milligram contains exactly 1,000 micrograms, a 5 mg vial contains 5,000 mcg of active peptide, and a 10 mg vial contains 10,000 mcg.
Understanding this conversion is the first step in establishing The Science of the Bacteriostatic Water Peptide Ratio. If we add 2 mL of bacteriostatic water to a 5 mg vial, we divide 5,000 mcg by 2 mL to find our concentration: 2,500 mcg per milliliter.
Calculating the Draw Volume for Custom Peptide Dilution Ratios
Once we know the concentration of our solution, we can calculate the exact volume required to extract our target research amount. This is where we use the classic dilution equation:
C1 × V1 = C2 × V2
In practical laboratory terms, we can simplify this math into a direct formula to find our draw volume:
Draw Volume (mL) = Target Amount (mcg) ÷ Concentration (mcg/mL)
For example, if our target research amount is 250 mcg and our reconstituted concentration is 2,500 mcg/mL, the calculation is:
250 mcg ÷ 2,500 mcg/mL = 0.1 mL
To translate this volume into a measurable amount on a standard syringe, we must convert milliliters to insulin syringe units. On a standard U-100 syringe, 1 mL of volume is divided into 100 individual units. Therefore, each unit represents exactly 0.01 mL.
To convert our draw volume to syringe units, we multiply the volume in milliliters by 100:
0.1 mL × 100 = 10 units
If you want to skip manual calculations during your laboratory sessions, you can use specialized digital tools such as the Peptide Calculator: Reconstitution, Dosage & Syringe Units (Free) , the Peptide Calculator – Cellgenic , or the Peptide Dosage Calculator — Free Online Tool | PeptideMind . These tools automate the math, reducing the risk of manual calculation errors.
How Reconstitution Volume Affects Custom Peptide Dilution Ratios
The volume of diluent we choose to add to a lyophilized vial directly dictates the ease and accuracy of our measurements.
Adding more water results in a lower concentration. A lower concentration is highly beneficial when working with very small target research amounts, as it increases the physical draw volume. Drawing 10 units on a syringe is significantly easier and more accurate than trying to measure a microscopic 2-unit draw.
Conversely, adding less water results in a higher concentration. This is ideal when we want to limit the total liquid volume administered to an experimental model. However, high concentrations make precise measurements more challenging because even a tiny air bubble or a single misread tick mark on the syringe can cause a massive deviation in the actual amount of peptide drawn.
To understand these dynamics further, read our guide on The Secret to Reconstituting Peptides 5mg Correctly.
To visualize how these volume choices impact your final concentrations, review the reference table below:
| Total Peptide Mass | Reconstitution Volume | Resulting Concentration | Draw Volume for 500 mcg Target | Syringe Units (U-100) |
|---|---|---|---|---|
| 2 mg (2,000 mcg) | 1.0 mL | 2,000 mcg/mL | 0.25 mL | 25 units |
| 2 mg (2,000 mcg) | 2.0 mL | 1,000 mcg/mL | 0.50 mL | 50 units |
| 5 mg (5,000 mcg) | 1.0 mL | 5,000 mcg/mL | 0.10 mL | 10 units |
| 5 mg (5,000 mcg) | 2.0 mL | 2,500 mcg/mL | 0.20 mL | 20 units |
| 10 mg (10,000 mcg) | 2.0 mL | 5,000 mcg/mL | 0.10 mL | 10 units |
| 10 mg (10,000 mcg) | 4.0 mL | 2,500 mcg/mL | 0.20 mL | 20 units |
Reconstitution Protocols and Best Practices for Lyophilized Peptides
Reconstitution is the process of dissolving freeze-dried peptide powder into a sterile liquid solution. Because lyophilized peptides are highly fragile, this process must be executed with care to preserve the integrity of the amino acid chains.
The primary diluent used in research is bacteriostatic water. Bacteriostatic water is sterile water containing 0.9% benzyl alcohol, which acts as a preservative to inhibit bacterial growth. This preservative allows the solution to be accessed multiple times over an extended period.
Plain sterile water, on the other hand, contains no preservative. Once a vial of sterile water is punctured, it must be used immediately and any remaining liquid discarded, as it can support bacterial growth within 24 to 48 hours.
To understand which diluent fits your specific laboratory needs, read about the Sterile Water and Bacteriostatic Water Differences You Must Know. For a comprehensive overview of the entire process, consult A Foolproof Way to Reconstitute Your Lyophilized Peptides.
Step-by-Step Reconstitution Technique
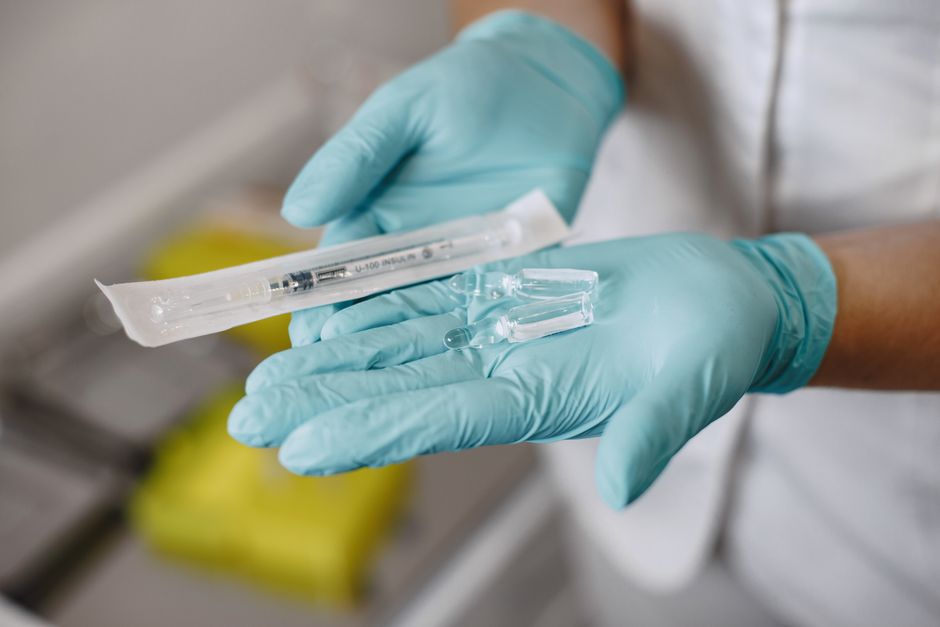
To ensure the stability of your peptides and maintain sterile conditions, we recommend following this standardized protocol:
- Temperature Equilibration: Allow the lyophilized peptide vial and the bacteriostatic water to reach room temperature (20–25°C) before beginning. Opening or reconstituting a cold vial can cause moisture condensation inside, which can accelerate peptide degradation.
- Sanitization: Thoroughly clean your workspace. Wipe the rubber stoppers of both the peptide vial and the diluent vial with a 70% isopropyl alcohol swab. Allow them to air-dry completely for 30 seconds.
- Vacuum Equalization: Peptide vials are sealed under a vacuum. To prevent the diluent from rushing in too quickly and damaging the peptide, draw an amount of air into your syringe equal to your target diluent volume. Insert the needle into the bacteriostatic water vial, inject the air, and draw out the required liquid volume.
- Dropwise Addition: Insert the syringe needle into the peptide vial at a 45-degree angle. Direct the needle tip toward the glass wall of the vial rather than pointing it directly at the lyophilized powder. Slowly press the plunger, letting the diluent trickle down the glass.
- Dissolution: Remove the syringe. Gently roll the vial between your palms or swirl it slowly. Never shake the vial. Shaking creates physical shear forces that can break delicate peptide bonds, leading to foaming and rapid degradation.
- Clarity Inspection: Hold the vial up to a light source. A properly reconstituted solution should be completely clear and colorless. If the powder does not dissolve immediately, place the vial in the refrigerator for 15 to 30 minutes to allow natural dissolution.
For a deeper dive into these mechanical steps, review our guide on Reconstituting Lyophilized Peptides Step-by-Step.
Storage and Stability Post-Reconstitution
Once reconstituted, peptides are highly sensitive to temperature, light, and physical movement.
Unreconstituted, lyophilized peptides can remain stable at room temperature for up to three months, as shown in a 2024 stability study where 17 of 18 lyophilized peptides maintained full stability under these conditions, with purity dropping only slightly from approximately 98% to 96% under extreme stress. For long-term storage, however, lyophilized powders should be kept at -20°C or -80°C.
Once a peptide is reconstituted, it must be stored in a refrigerator at 2–8°C (36–46°F) and protected from light. Reconstituted peptides should never be frozen, as the formation of ice crystals can tear the delicate peptide structures apart.
The stability of reconstituted peptides varies by compound. For example, a stability study on the MOTS-c peptide showed that it maintained greater than 99% purity for the first 14 days when stored at 2–4°C, but its purity dropped below 98% by day 30. As a general rule under USP <797> guidelines, any compound reconstituted with bacteriostatic water should be used within 28 days of the initial vial puncture.
To protect your compounds from degradation, implement the Best Practices for Peptide Storage Handling.
Calculating Ratios for Multi-Peptide Blends and Custom Combinations
A peptide blend is a single vial that contains two or more active peptide compounds in a fixed ratio, reconstituted together using a single volume of diluent. Calculating the correct draw volumes for these blends requires a slightly different approach than single-compound vials.
To navigate this math, we use the concept of an anchor compound. The anchor compound is typically the peptide in the blend that has the most stringent research parameters or the tightest measurement requirements. Once we determine the required draw volume to achieve the target amount of our anchor compound, the proportional amounts of the other blended peptides will naturally follow based on the fixed ratio established during synthesis.
For example, if you are working with a blend containing 5 mg of BPC-157 and 5 mg of TB-500, the ratio is a simple 1:1. If you reconstitute this blend with 2 mL of bacteriostatic water, each compound will have a concentration of 2,500 mcg/mL. To learn more about managing these specific ratios, see our guide on BPC-157 Reconstitution Ratios Made Easy for Research.
Single Peptide Calculations vs. Blend Calculations
In single peptide calculations, we only need to balance one mass figure against our diluent volume. In blend calculations, we must track multiple distinct concentrations within the same liquid volume.
Consider a custom combination vial containing:
- 5 mg of Compound A
- 10 mg of Compound B
If we add 2 mL of bacteriostatic water to this vial, we must calculate two separate concentrations:
- Compound A: 5,000 mcg ÷ 2 mL = 2,500 mcg/mL
- Compound B: 10,000 mcg ÷ 2 mL = 5,000 mcg/mL
If our research protocol requires 250 mcg of Compound A, we designate Compound A as our anchor compound. We calculate the draw volume based on this anchor:
Draw Volume = 250 mcg ÷ 2,500 mcg/mL = 0.1 mL (10 units on a U-100 syringe)
Because the compounds are physically blended in the same solution, drawing 0.1 mL of liquid will also deliver a proportional amount of Compound B. To find out exactly how much Compound B is in that same draw, we multiply the draw volume by Compound B’s concentration:
0.1 mL × 5,000 mcg/mL = 500 mcg of Compound B
When working with these multi-peptide formulations, always verify that the resulting proportional amounts align with your experimental design before proceeding. For a practical look at how this applies to tissue-repair research, consult the BPC-157 Reconstitution Complete Guide.
Common Reconstitution and Calculation Errors to Avoid
Even experienced researchers can make simple errors that compromise their solutions. Understanding these pitfalls is the best way to prevent them.
- Vigorous Shaking: Shaking a vial to speed up dissolution is one of the most common physical errors. This introduces air bubbles, creates foaming, and can denature fragile peptide structures through mechanical shear stress.
- Decimal and Unit Errors: Confusing milligrams (mg) and micrograms (mcg) can lead to a tenfold error in concentration. Always write out your calculations and double-check that your units are aligned.
- Misinterpreting Syringe Markings: Assuming all syringes are calibrated the same way can lead to major errors. For example, using a U-40 syringe with calculations meant for a U-100 syringe will result in an accidental 2.5-fold calculation discrepancy. Always verify the syringe type and calibration before drawing.
- Ignoring Dead Space: Syringe “dead space” is the tiny amount of liquid that remains in the needle hub after the plunger is fully depressed. While negligible for large volumes, it can introduce measurement variations when working with ultra-low volumes.
- Using Plain Sterile Water for Multi-Draw Protocols: Reconstituting a vial with plain sterile water and accessing it over several weeks compromises sterility, as sterile water lacks the preservative needed to prevent bacterial growth.
To ensure your research remains on track, review The 10 Most Common Mistakes People Make When They’re New to Peptide Research.
Frequently Asked Questions about Peptide Reconstitution
What information is needed from a Certificate of Analysis (CoA) for accurate calculations?
To perform highly precise calculations, you should look beyond the basic vial label and consult the manufacturer’s Certificate of Analysis (CoA). The key metrics to identify are:
- HPLC Purity: This represents the percentage of the target peptide relative to any peptide-related impurities. High-quality research compounds should exhibit a purity of 98% or higher.
- Net Peptide Content (NPC): This is different from HPLC purity. Lyophilized peptide powders naturally contain residual water, moisture, and counterions (such as TFA salts) from the synthesis process. The NPC tells you the actual percentage of peptide mass in the powder. If a vial is labeled as containing 5 mg of peptide but has an NPC of 80%, it actually contains 4 mg of active peptide. Adjusting your math to account for NPC ensures absolute precision in quantitative research.
What should be done if a reconstituted peptide solution appears cloudy?
A properly reconstituted peptide solution should be completely clear and free of visible particles. If your solution appears cloudy, milky, or contains floating particles, consider the following steps:
- Allow More Time: Some hydrophobic or highly structured peptides dissolve slowly. Place the vial in the refrigerator for 15 to 30 minutes and check it again.
- Evaluate pH Requirements: Some peptides have specific isoelectric points (pI) that make them insoluble in neutral bacteriostatic water. For example, acidic peptides may require a slightly basic environment to dissolve, while basic peptides may need a slightly acidic diluent. In these cases, using a tiny amount of 0.1% or 0.6% sterile acetic acid can help achieve complete dissolution.
- Discard Compromised Solutions: If the solution remains cloudy or contains visible precipitates after 30 minutes, it should be discarded. Cloudiness can indicate poor synthesis quality, contamination, or irreversible peptide denaturation.
How do you convert between milligrams, micrograms, and syringe units?
Converting between these units is straightforward once you memorize the standard conversions:
- Mass: 1 milligram (mg) = 1,000 micrograms (mcg)
- Volume: 1 milliliter (mL) = 100 units on a standard U-100 insulin syringe
- Unit Value: 1 syringe unit = 0.01 mL of volume
To find the mass of peptide in a single syringe unit, use this formula:
mcg per unit = Total peptide mass in vial (mcg) ÷ Total reconstitution volume in units
For example, if you add 2 mL (200 units) of bacteriostatic water to a 5 mg (5,000 mcg) vial:
5,000 mcg ÷ 200 units = 25 mcg per unit
Conclusion
Mastering custom peptide dilution ratios is not just about avoiding mistakes; it is about ensuring the integrity and reproducibility of your scientific research. By understanding the math, choosing the right diluents, and using proper physical handling techniques, you can ensure that your experimental models receive precise, consistent amounts of your target compounds.
At BioGenix Peptides, we are committed to supporting scientific integrity by providing high-purity, lab-tested compounds and clear, practical resources. To learn more about standardizing your laboratory preparation techniques, explore our guide on Mixing Peptides Like a Pro.