The Complete Guide to Safe Peptide Injection Protocol
What Every Researcher Needs to Know About Peptide Administration Protocol
Disclaimer: The information provided in this article is for educational and informational purposes only. It is not intended as medical advice, diagnosis, or treatment. Products and compounds referenced are for research use only and are not approved for human or veterinary consumption. Always consult a qualified professional regarding health or medical decisions.
Disclaimer: The information provided in this article is for educational and informational purposes only. It is not intended as medical advice, diagnosis, or treatment. Products and compounds referenced are for research use only and are not approved for human or veterinary consumption. Always consult a qualified professional regarding health or medical decisions.
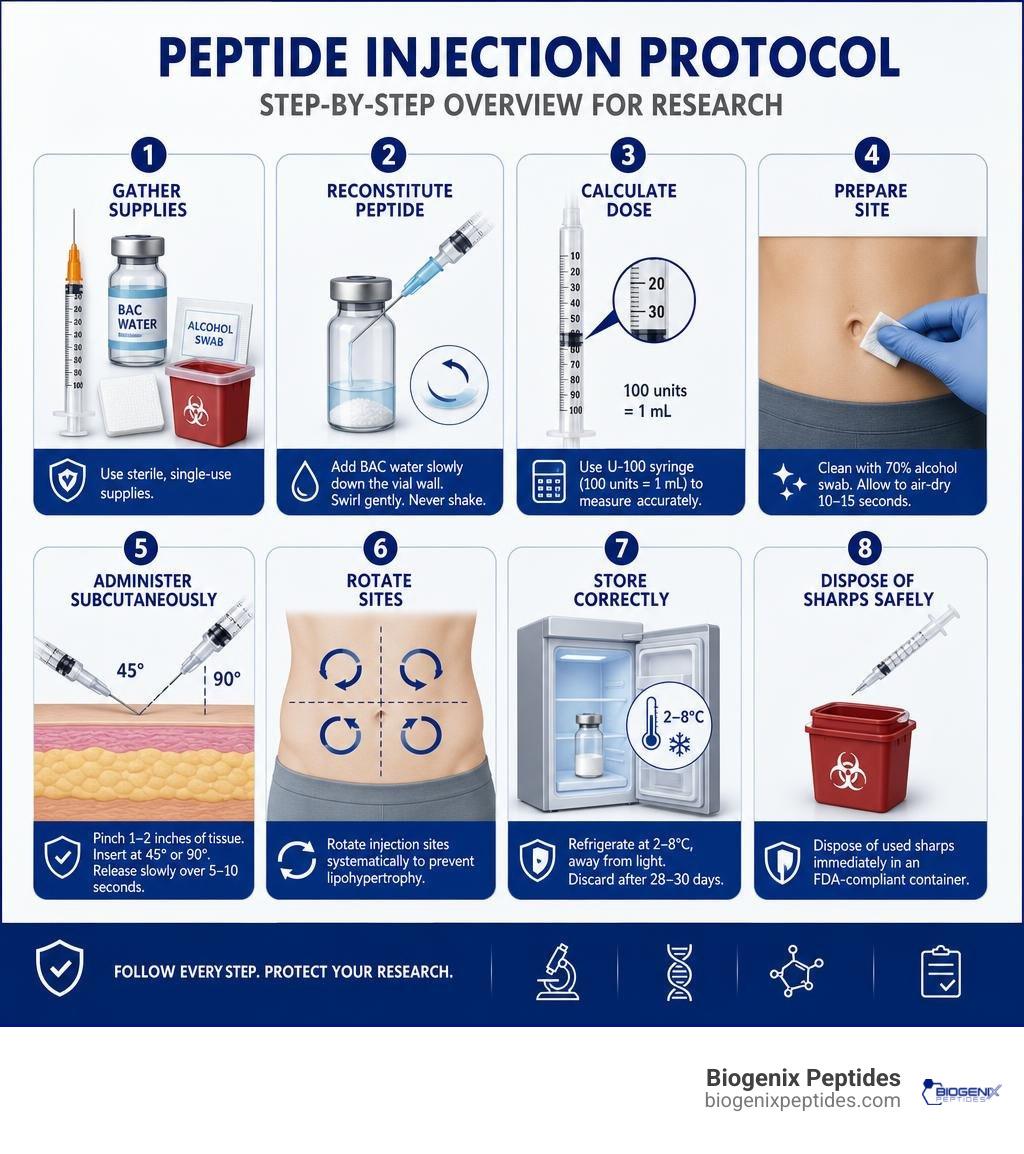
A peptide administration protocol is a structured, step-by-step research procedure for reconstituting, measuring, administering, and storing peptide compounds via subcutaneous delivery. Here is a quick overview of the core steps involved in research settings:
- Gather sterile supplies – insulin syringe (27G-31G), bacteriostatic water (BAC water), alcohol swabs, sterile gauze, and a sharps container
- Reconstitute the lyophilized peptide – add BAC water slowly along the inner glass wall of the vial; swirl gently, never shake
- Calculate the research amount – use U-100 syringe calibration (100 units = 1 mL) to convert micrograms to units accurately
- Prepare the administration site – clean with a 70% isopropyl alcohol swab; allow to air-dry for 10-15 seconds
- Administer subcutaneously – pinch 1-2 inches of tissue, insert at 45° or 90° depending on tissue depth, release slowly over 5-10 seconds
- Rotate sites systematically – cycle through abdominal quadrants or lateral thighs to prevent lipohypertrophy
- Store the reconstituted vial correctly – refrigerate at 2-8°C, away from light; discard after 28-30 days
- Dispose of sharps safely – use an FDA-compliant sharps container immediately after each use
Understanding why each step matters is just as important as following the steps themselves. Most problems in peptide research — degraded compounds, inconsistent results, contamination — trace back to skipped or rushed protocol steps, not the peptides themselves.
Therapeutic peptides have extremely low oral bioavailability (as low as 1-2%) because stomach acid and digestive enzymes break them down before they can reach systemic circulation. This is why subcutaneous administration is the standard route in research settings — it bypasses the digestive tract entirely and delivers the compound directly into the tissue where it can be absorbed.
Getting the protocol right from the start protects both the integrity of the research and the quality of the data.
I’m Jay Daniel, Founder and CEO of BioGenix Peptides, with years of hands-on experience in peptide sourcing, quality validation, and developing precise research-grade peptide administration protocols for laboratory professionals worldwide. In this guide, I’ll walk through every stage of the process — from sterile preparation through safe sharps disposal — so your research is built on a solid, reproducible foundation.
Essential Supplies for a Sterile Research Environment
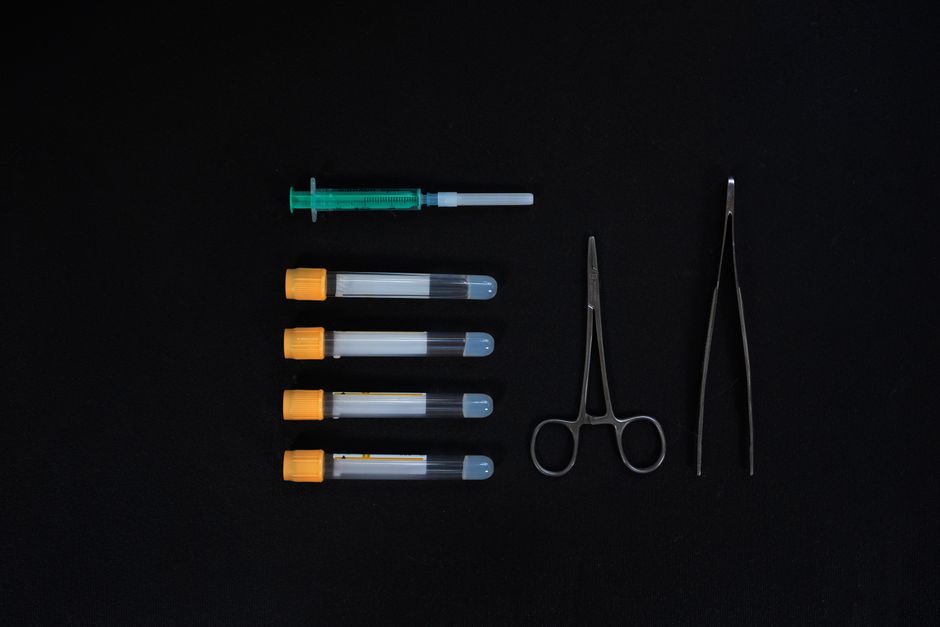
When establishing a laboratory workflow, working with incomplete materials mid-procedure is the fastest route to a contamination error. Before initiating any laboratory work, we must assemble a complete array of sterile tools. Every item in this checklist plays a vital role in maintaining the integrity of the compound and protecting the safety of the laboratory environment.
- Bacteriostatic Water (BAC Water): This is sterile water containing 0.9% benzyl alcohol as a preservative. The presence of benzyl alcohol is critical because it suppresses microbial growth, making it the only acceptable diluent for multi-use vials.
- Insulin-Style Syringes: These are typically U-100 syringes, calibrated specifically for ultra-precise micro-measurements. Standard syringes lack the fine calibration markings required for precise micro-measurements.
- 70% Isopropyl Alcohol Swabs: Used to sanitize vial stoppers and the local application area.
- Sterile Gauze Pads: Useful for applying gentle post-administration pressure.
- FDA-Compliant Sharps Container: A puncture-resistant container designed for the immediate disposal of used metal tools.
Skipping sterile steps—even occasionally—introduces micro-contamination risks that accumulate over a multi-week laboratory protocol. To build a reliable foundation, explore our detailed guide on Creating a Sterile Research Environment.
Additionally, we must emphasize that standard sterile water is not a substitute for bacteriostatic water when preparing multi-use vials. Sterile water lacks a preservative, meaning any micro-organism introduced during the first entry will multiply rapidly. To understand the chemical differences, read our resource on Sterile Water and Bacteriostatic Water Differences You Must Know.
Reconstitution and Measurement Calculation in a Peptide Administration Protocol
Reconstitution is the chemical process of returning a freeze-dried (lyophilized) peptide powder back into a liquid state. Because these molecules are highly fragile, the physical force of the liquid introduction can easily shear or denature their delicate tertiary structures.
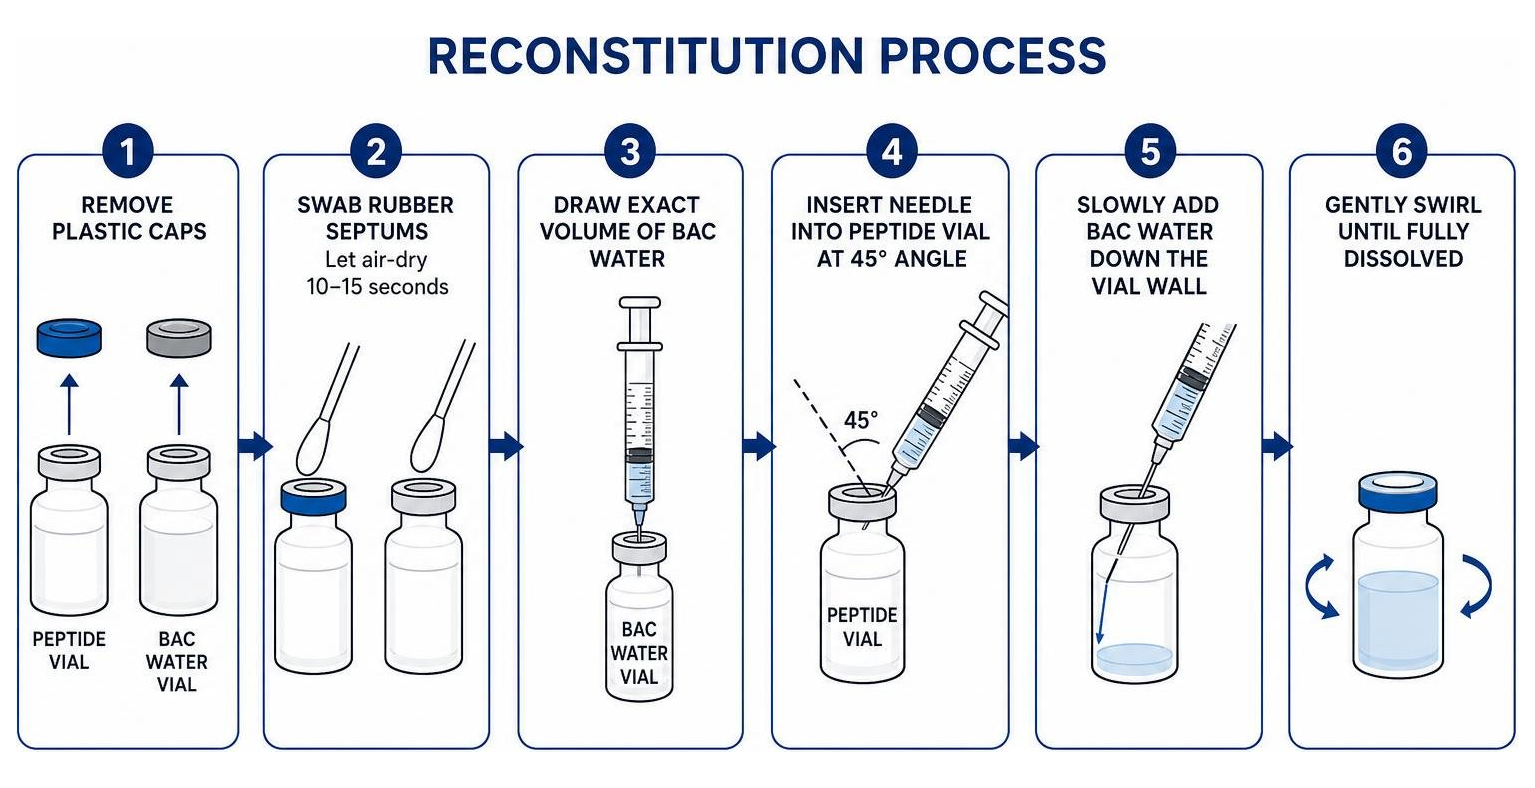
To perform this step safely:
- Remove the plastic caps from both the peptide vial and the bacteriostatic water vial.
- Swab the rubber septum of both vials with a fresh alcohol swab and let them air-dry for 10 to 15 seconds.
- Draw the exact volume of bacteriostatic water into your mixing syringe.
- Insert the needle through the rubber stopper of the peptide vial at a 45-degree angle.
- Aim the needle tip directly against the inner glass wall of the vial. Slowly depress the plunger, allowing the diluent to run down the side of the glass rather than spraying directly onto the powder.
- Once the liquid is fully introduced, gently swirl the vial between your fingers. Never shake the vial. Shaking introduces mechanical stress and foaming, which can physically degrade the molecular chains.
For a comprehensive walkthrough of this process using specific research molecules, see our BPC-157 Reconstitution Complete Guide and learn how to simplify your laboratory math with BPC-157 Reconstitution Ratios Made Easy for Research.
Reconstitution Math and Syringe Calibration for a Peptide Administration Protocol
To ensure precise measurements, we must understand how to convert dry mass (milligrams) into liquid volume (milliliters) and finally into syringe units.
Standard insulin syringes are calibrated to the U-100 standard, meaning there are exactly 100 units in 1 milliliter (mL) of liquid.
Let us look at a practical calculation:
- We have a vial containing 5 mg (5,000 micrograms) of lyophilized peptide.
- We reconstitute this vial with 2 mL of bacteriostatic water.
- This yields a concentration of 2,500 micrograms per milliliter (5,000 mcg / 2 mL = 2,500 mcg/mL).
- Since 1 mL equals 100 units on our syringe, we divide 2,500 mcg by 100 units to find the value per unit: 25 micrograms per unit (2,500 mcg / 100 = 25 mcg).
- If our target research amount is 250 micrograms, we draw exactly 10 units on the syringe (250 mcg / 25 mcg per unit = 10 units).
Mastering these ratios prevents measurement errors. For a deeper look at different vial sizes, consult A Foolproof Way to Reconstitute Your Lyophilized Peptides.
Administration Sites and Proper Technique
Subcutaneous delivery targets the fatty tissue layer situated directly beneath the skin and above the muscle. This tissue has a sparse blood supply, allowing for slow, sustained, and highly predictable absorption.
The primary subcutaneous zones include:
- The Abdomen: Specifically the lower quadrants, keeping at least 2 inches (5 cm) away from the navel and avoiding the midline.
- The Lateral Thighs: The outer, fleshy aspect of the upper thighs.
- The Flanks: The love-handle area on either side of the lower back.
Systematic rotation of these zones is critical. If we apply the compound to the exact same spot repeatedly, the tissue can develop lipohypertrophy—a localized buildup of fibrous fat tissue. Lipohypertrophy results in erratic and reduced drug absorption, directly undermining clinical and research outcomes. To prevent this, keep each individual application point at least 1 inch (2.5 cm) away from the previous one, and rotate through different quadrants weekly.
Furthermore, we advise against applying ice to numb the area beforehand. Ice-induced vasoconstriction alters the local tissue environment, which can impair absorption dynamics and mask early signs of localized reactions. For additional safety considerations, read the Peptide Administration Safety 2026 guide.
Step-by-Step Administration Guide within a Peptide Administration Protocol
Once the site is selected and the measurement is drawn, follow this precise mechanical protocol:
- Sanitize: Wash your hands thoroughly for 20 seconds. Clean the selected skin site with an alcohol swab using a circular motion. Let the alcohol air-dry completely; administering through wet alcohol causes localized stinging and can impair peptide stability.
- Pinch: Use your non-dominant hand to gently pinch 1 to 2 inches of skin, elevating the subcutaneous fat layer away from the underlying muscle.
- Insert: Hold the syringe like a pencil. Insert the needle swiftly. The 2016 FITTER international consensus recommends short 4mm needles for most subjects to minimize the risk of accidental muscle penetration. If utilizing a short needle, insert at a 90-degree angle. If the subject has very little subcutaneous fat or you are using a longer needle, insert at a 45-degree angle.
- Infuse: Release the skin pinch and depress the plunger slowly and steadily over 5 to 10 seconds.
- Withdraw: Pull the needle straight out at the same angle it entered. Apply gentle pressure with sterile gauze for a few seconds. Do not rub the site, as rubbing can cause tissue trauma and alter absorption.
- Dispose: Drop the syringe immediately into your sharps container. Never attempt to recap the needle manually, as recapping is the primary source of accidental needle-stick injuries.
For a detailed visual guide on avoiding common technique errors, refer to How to Administer Peptides at Home — A Step-by-Step Safety Guide.
Storage, Stability, and Regulatory Considerations
Peptides are highly sensitive to thermal fluctuations, UV light, and mechanical agitation. To maintain their structural integrity, we must adhere to strict storage protocols.
| Peptide State | Optimal Storage Temperature | Shelf Life | Key Handling Rules |
|---|---|---|---|
| Lyophilized (Dry Powder) | -20°C (Freezer) or 2-8°C (Fridge) | 12 to 24 Months | Keep away from direct light and moisture. |
| Reconstituted (Liquid) | 2-8°C (Refrigerator) | 28 to 30 Days | Store in the center of the fridge; do not freeze. |
Once reconstituted, these compounds must never be placed in the freezer. Freezing a liquid solution containing benzyl alcohol can cause the glass vial to crack or lead to irreversible denaturation of the peptide chains. To protect your research compounds from thermal degradation, read our guidelines on Peptide Storage Stability Guidelines and learn how to keep your solutions stable with Don’t Let Your Peptides Lose Their Cool.
Legal Status and FDA Compounding Rules
In the United States, the regulatory landscape surrounding therapeutic peptides is complex and evolving. Section 503A of the Federal Food, Drug, and Cosmetic Act governs traditional compounding pharmacies. The FDA maintains a “bulks list” of substances that compounders are permitted to use. In recent years, several popular peptides have been moved off or excluded from these lists, placing them in a regulatory gray area for clinical compounding.
For laboratory researchers, sourcing is a critical quality concern. Research-grade peptides purchased from unverified online vendors can have purity levels as low as 60%. These low-purity products often contain residual solvents, heavy metals, or truncated peptide sequences, which dramatically increase the risk of toxicity and immunogenicity (an unwanted immune response where the subject’s body treats the peptide as a threat).
Ensuring a purity level of 98% or higher is vital for obtaining reliable, reproducible scientific data. To explore how these regulatory standards affect modern laboratory research, see The Complete Guide to Peptides in Scientific Research.
Frequently Asked Questions about Peptide Administration
What is the difference between bacteriostatic water and sterile water?
Bacteriostatic water contains 0.9% benzyl alcohol, which serves as a preservative to inhibit the growth of bacteria. This makes it safe for multi-use vials that will be accessed repeatedly over several weeks. Sterile water contains no preservatives; once opened, it must be administered immediately for a single application and any remaining liquid must be discarded. To learn more about selecting the correct diluent, read Bacteriostatic Water for Administration Don’t Let Your Research Go Down the Drain.
How should reconstituted peptides be stored to prevent degradation?
Reconstituted peptides must be stored in a refrigerator at a constant temperature of 2-8°C (approximately 4°C). They should be kept in their original boxes or wrapped to protect them from light exposure. Avoid storing them in the refrigerator door, as the temperature fluctuates every time the door is opened. For more tips on maintaining freshness, check out Cold Storage Secrets for Keeping Reconstituted Peptides Fresh.
What are the signs of local tissue irritation or infection?
Normal, transient reactions at the application site include mild redness, slight swelling, or a brief stinging sensation that resolves within a few hours.
However, signs of a localized infection (such as cellulitis or an abscess) include:
- Redness that expands significantly beyond the initial spot over 24 to 48 hours.
- The area feeling increasingly hot to the touch.
- Worsening pain, throbbing, or deep tenderness.
- Purulent discharge (pus) from the insertion point.
- Systemic symptoms, such as a fever exceeding 38.5°C (101.3°F), chills, or fatigue.
If any of these infectious signs occur, seek professional medical evaluation immediately.
Conclusion
At BioGenix Peptides, we believe that successful research is built entirely on safety, precision, and rigorous protocol adherence. By utilizing high-purity compounds, maintaining a sterile environment, executing precise calculations, and storing materials under strict temperature controls, researchers can eliminate variables and protect the integrity of their data.
To source verified, high-purity compounds for your laboratory, Explore our research products today.