Detailed Guide to Peptide Vial Labeling Requirements
Disclaimer: The information provided in this article is for educational and informational purposes only. It is not intended as medical advice, diagnosis, or treatment. Products and compounds referenced are for research use only and are not approved for human or veterinary consumption. Always consult a qualified professional regarding health or medical decisions.
Why Accurate Peptide Vial Labeling Matters
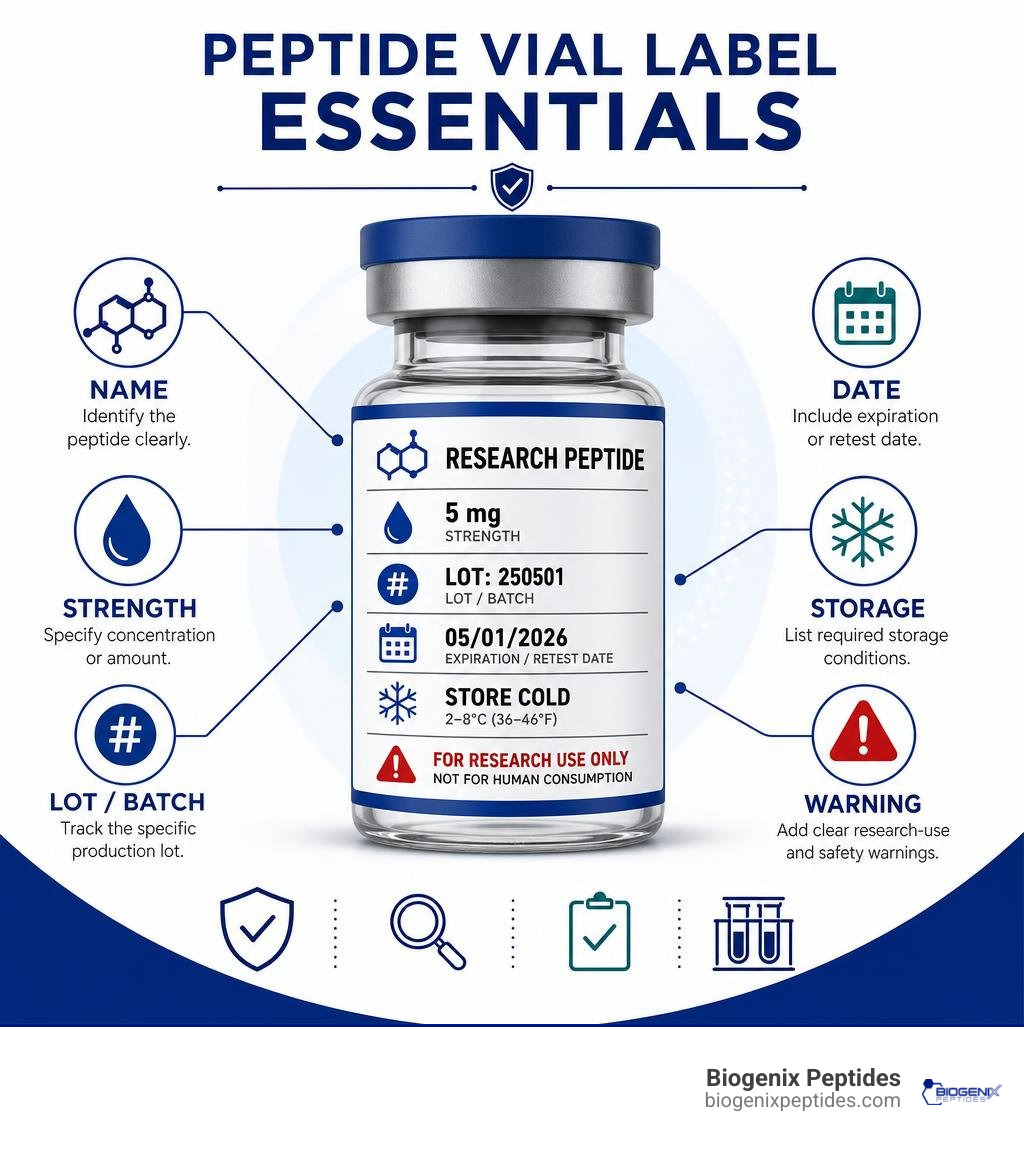
Effective peptide vial labeling makes each research sample easy to identify, track, store, and verify. At minimum, include the compound name, concentration or strength, lot or batch number, expiration or retest date, storage conditions, and clear research-only warnings. Use a label material and adhesive that can withstand the vial’s storage environment, then test the label on the actual vial before full production.
Small vial labels have limited space, so clear hierarchy matters. Put the compound name first, keep critical handling details readable, and avoid placing essential text too close to curved edges where it can wrinkle or become hard to scan.
Labels also support traceability without requiring unnecessary personal information. A lot number and optional barcode or QR code can connect a vial to internal research records while helping labs reduce mix-ups and maintain organized inventory.
I am Jay Daniel, Founder and CEO of BioGenix Peptides, with hands-on experience in peptide sourcing, quality control, and research-focused product standards. My work in peptide vial labeling centers on clear identification, responsible research communication, and practical laboratory traceability.
Essential Standards for Peptide Vial Labeling
When managing laboratory inventory, accurate vial identification is the bedrock of scientific reproducibility and laboratory safety. In the landscape of scientific investigation, an unreadable or missing label turns a high-grade synthesized compound into a mystery container. In experimental science, a mystery vial is a wasted vial.
Working with synthetic compounds requires strict adherence to identification protocols. Applying proper safety standards and regulatory markers on peptide containers ensures that every researcher handling the material knows exactly what compound is present, its purity parameters, and its designated non-clinical status. Clear labeling is also the easiest way to prevent experimental mix-ups, cross-contamination, and incorrect reconstitutions.
All research-grade vials must feature explicit non-clinical warnings. Emblazoning phrases such as “For Research Use Only” (RUO) and “Not for Human Consumption” on the face-stock establishes clear handling boundaries. These disclosures reinforce that the material inside is strictly intended for in vitro laboratory experimentation, analytical assays, or animal research protocols conducted under controlled conditions.
Core Information Elements on Vial Labels
Given the compact real estate on standard laboratory containers, information architecture must be sharp and uncluttered. Every square millimeter counts. A comprehensive research label features primary data points that correlate directly with the compound’s analytical verification.

Key technical specifications that belong on the primary container label include:
- Compound Identity: The exact chemical name, designated acronym, or catalog identifier.
- Net Mass or Total Content: The nominal quantity present in the dry state (e.g., 5mg, 10mg).
- Purity Benchmark: The analytical purity percentage confirmed by high-performance liquid chromatography.
- Lot and Batch Numbers: Specific manufacturing run numbers connecting the vial back to its batch-specific Certificate of Analysis. When evaluating analytical records, understanding HPLC and Mass Spectrometry data on a peptide COA confirms chemical identity and purity before the vial ever hits the shelf.
- Physical State: Clarification if the compound is in a lyophilized powder form or stable liquid matrix.
- Machine-Readable Codes: 2D DataMatrix or high-density QR codes linking directly to online digital specification sheets, safety data, or automated laboratory information management systems (LIMS).
Reconstitution Tracking and Storage Data
Once a lyophilized compound undergoes reconstitution, its biochemical stability profile changes dramatically. A dry cake stored in deep cold can remain stable for extended periods, but adding a liquid medium begins the clock on biological degradation.
To maintain experimental integrity, labels should provide dedicated, writable zones or pre-printed fields for reconstitution tracking:
- Reconstitution Date and Time: The exact point when the diluent was introduced.
- Diluent Identity: The reconstitution medium used (e.g., sterile bacteriostatic solution, deionized water, or specific laboratory buffers).
- Working Concentration: The final concentration achieved per milliliter (e.g., 2mg/mL or 5mg/mL).
- Target Temperature Range: Required environmental settings, such as 2°C to 8°C for short-term preservation or -20°C for extended hold periods. Following standard storage and handling practices for peptides prevents premature aggregation and protects delicate peptide structures.
- Retest or Disposal Date: Clear notation for when working stability expires (commonly 28 days under refrigerated conditions for liquid matrices).
Selecting Durable Materials for Cryogenic and Cold Storage
A beautifully designed label is useless if it falls off the glass in the refrigerator or smudges the moment condensation forms. Laboratory freezers and cold rooms subject containers to moisture, frost, sub-zero temperatures, and organic solvents.
Label failure usually happens at the adhesive layer. Standard commercial adhesives crystallize and turn brittle below freezing, causing the label to peel away from curved glass. To maintain sample integrity, facilities must select materials built to survive specific temperature windows, as outlined in comprehensive peptide stability and storage guidelines.
| Material Type | Operating Temp Range | Moisture & Frost Resistance | Best Laboratory Use Case |
|---|---|---|---|
| BOPP Film (Polypropylene) | -40°C to 100°C | Excellent / Condensation Proof | Refrigerators (2°C–8°C) & Standard Freezers (-20°C) |
| Waterproof Vinyl | -20°C to 80°C | High / Chemical Resistant | General benchtop use, short-term cold storage |
| Cryogenic Polyfilm | -196°C to 120°C | Superior / Immersion Proof | Deep freeze (-80°C) and Liquid Nitrogen storage |
| Coated Matte Paper | -10°C to 60°C | Poor / Vulnerable to Water | Dry ambient storage only; temporary batch tagging |
BOPP Film and Waterproof Vinyl
For the vast majority of refrigerated and standard freezer applications, Biaxially-Oriented Polypropylene (BOPP) is the gold standard. BOPP is a synthetic plastic face-stock that resists moisture, oils, and mild laboratory solvents. Unlike standard paper, which absorbs condensation and turns to mush when moved from a cold freezer to a warm bench, BOPP retains its structural rigidity and print sharpness.
Paired with a high-tack, permanent emulsion acrylic adhesive, BOPP labels bond securely to small-radius glass and plastic vials. Waterproof synthetic vinyl provides a flexible alternative that wraps effortlessly around tight curves without “flagging”—the frustrating tendency of stiff label edges to pop up and unwrap over time.
Cryogenic and Heat-Shrink Solutions
When experimental protocols require ultra-low temperature preservation in -80°C deep freezers or immersion in liquid nitrogen phase (-196°C), specialized cryogenic materials are essential.
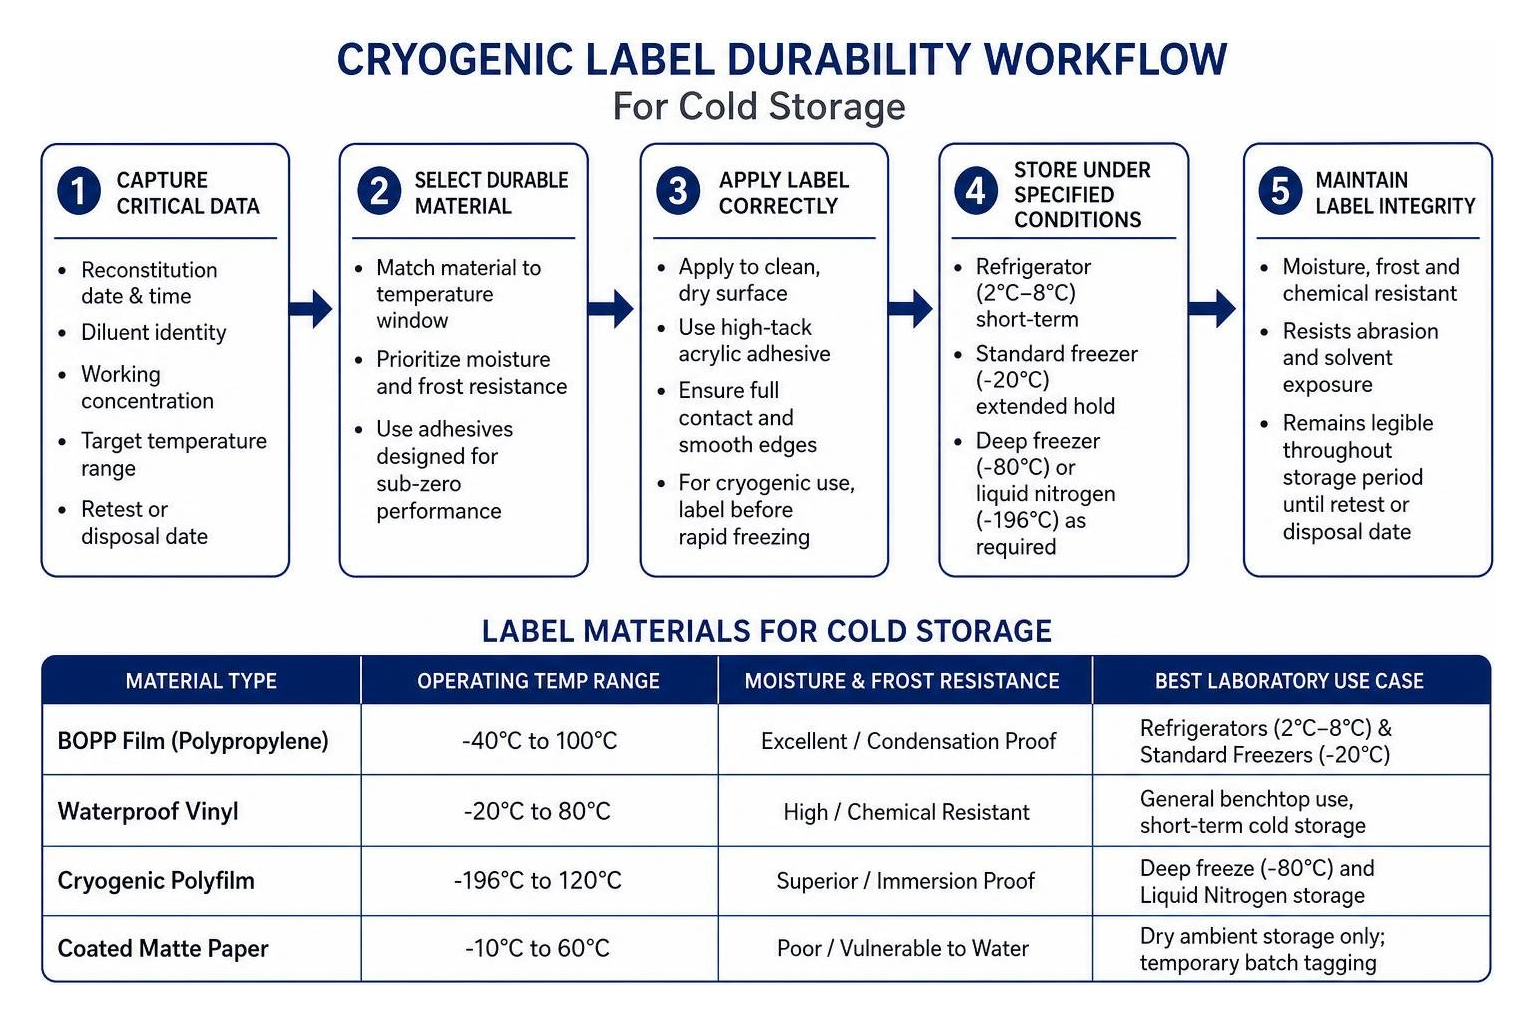
Cryogenic labels use specialized deep-freeze acrylic adhesives that remain pliable and tacky even in extreme cold. These labels can be applied to dry containers at room temperature before undergoing rapid freezing cycles.
For advanced security, heat-shrink tubing and wrap-around self-laminating films provide an extra layer of protection. Self-laminating designs include a clear tail that wraps entirely around the vial, covering the printed area. This creates a physical barrier against abrasion, ice scraping, and exposure to cleaning solvents like ethanol and isopropanol.
Sizing, Formats, and Production Best Practices
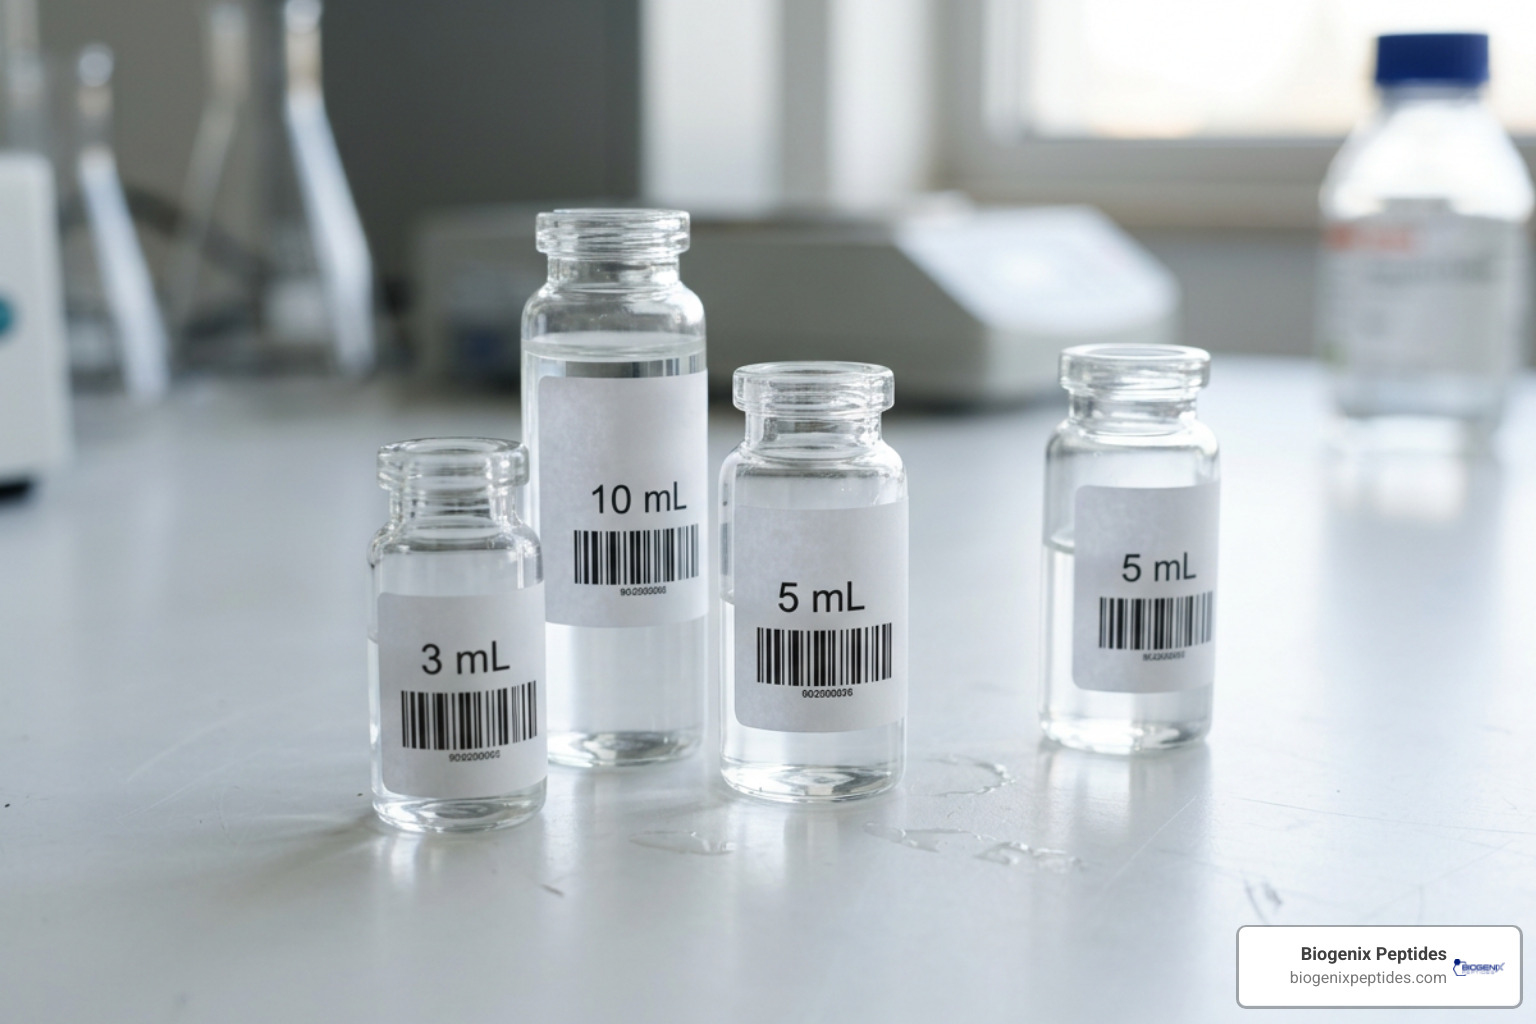
Designing labels for small containers requires a careful balance of visual clarity, geometric constraints, and print resolution. Standard peptide containers are small, typically holding 3mL, 5mL, or 10mL volumes. Attempting to fit a novel’s worth of text onto a 3mL container creates an unreadable smudge.
To produce clean, print-ready results, designers should use vector graphics (AI, EPS, or vector PDF formats) with text rendered at 300 DPI or higher. Maintain high contrast—such as crisp black typography against a clean white or light background—to keep micro-text legible under ambient laboratory lighting.
Sizing and Dimensions for Peptide Vial Labeling
Selecting the right label dimensions depends on the container’s outer diameter, height, and curvature:
- 3mL Vials: Standard dimensions range from 1.5″ x 0.75″ to 1.75″ x 0.75″. This allows sufficient space for the compound title, concentration, and lot code while leaving a clear viewing window.
- 5mL to 10mL Vials: Commonly accommodate 2.0″ x 1.0″ or 2.25″ x 1.125″ formats, providing extra space for secondary warnings, barcodes, and reconstitution logs.
- The Inspection Gap: A critical best practice is designing the label width slightly smaller than the vial’s full outer circumference. Leaving a 2mm to 4mm clear vertical gap allows researchers to visually inspect the liquid or lyophilized cake inside without peeling back the label.
Sourcing Options: Custom vs. Pre-Printed Peptide Vial Labeling
Laboratories and research supply operations have several reliable avenues for acquiring compliant labels, depending on production volume and budget:
- Freelance Design Specialists: Platforms like Fiverr feature over 500 dedicated packaging and label designers specializing in research products. Top-rated freelancers (often maintaining 4.9-star ratings across hundreds of verified reviews) deliver print-ready vector files, custom branding, and photorealistic 3D mockups. Turnaround times generally range from 24 to 72 hours, costing between $15 and $60 per design layout.
- Turnkey Marketplaces: For stock solutions, marketplaces like Amazon list thousands of options. Pre-printed or semi-custom adhesive sheets start at economical entry points (often around $5.79 to $12.00 for packs of 100 to 500 labels), including holographic security finishes and standard Avery formats (such as Avery 5160).
- In-House On-Demand Printing: For facilities managing dynamic inventory with rapidly changing lot numbers, on-demand thermal transfer printers (like portable mini label makers or industrial Brady/Zebra systems) offer complete flexibility. Dedicated label printing software allows researchers to instantly print batches with variable data, high-density barcodes, and custom timestamping.
Using 3D mockups during the design phase provides immediate visual verification. A digital 3D rendering simulates the real-world curvature of the glass, helping you spot awkward line breaks, overlapping text, and unreadable barcodes before spending money on a full print run.
Frequently Asked Questions About Peptide Vial Labeling
What information is mandatory on research-grade peptide vial labels?
Research labels must feature the exact chemical or catalog name of the compound, the nominal net weight or mass (e.g., 5mg, 10mg), the verified analytical purity percentage, and a unique lot or batch number. Crucially, they must also display non-clinical disclaimers such as “For Research Use Only” and “Not for Human Consumption,” alongside the designated storage temperature range.
Which label material is recommended for refrigerated peptide vials?
Biaxially-Oriented Polypropylene (BOPP) film paired with a permanent acrylic freezer adhesive is the ideal choice for refrigerated vials (2°C to 8°C). BOPP provides complete moisture and condensation resistance, preventing wrinkling, ink bleeding, or label detachment when vials are transferred between cold storage and room-temperature workstations.
Why are 3D mockups important before label production?
Small-diameter vials curve tightly, which distorts straight lines and horizontal text blocks. A 3D digital mockup allows you to verify readability across the curved glass, confirm that critical text remains visible from a single viewing angle, check the size of the inspection gap, and verify that barcode elements can be scanned cleanly without edge distortion.
Conclusion
Rigorous scientific standards require precision at every step of synthesis, storage, and documentation. Clear, durable labeling protects your investment in high-purity compounds by preventing misidentification, simplifying inventory tracking, and keeping critical analytical data legible throughout an experiment’s lifecycle.
Choosing high-tack synthetic face-stocks like BOPP, maintaining clear information hierarchy, and including complete non-clinical disclaimers ensures your laboratory runs efficiently and safely.
When preparing your compounds for analytical evaluation, pairing compliant containers with premium laboratory reagents—such as sterile bacteriostatic water reconstitution solutions—maintains stability and delivers consistent, reliable experimental outcomes. Protect your research by making accurate labeling a standard laboratory protocol.